


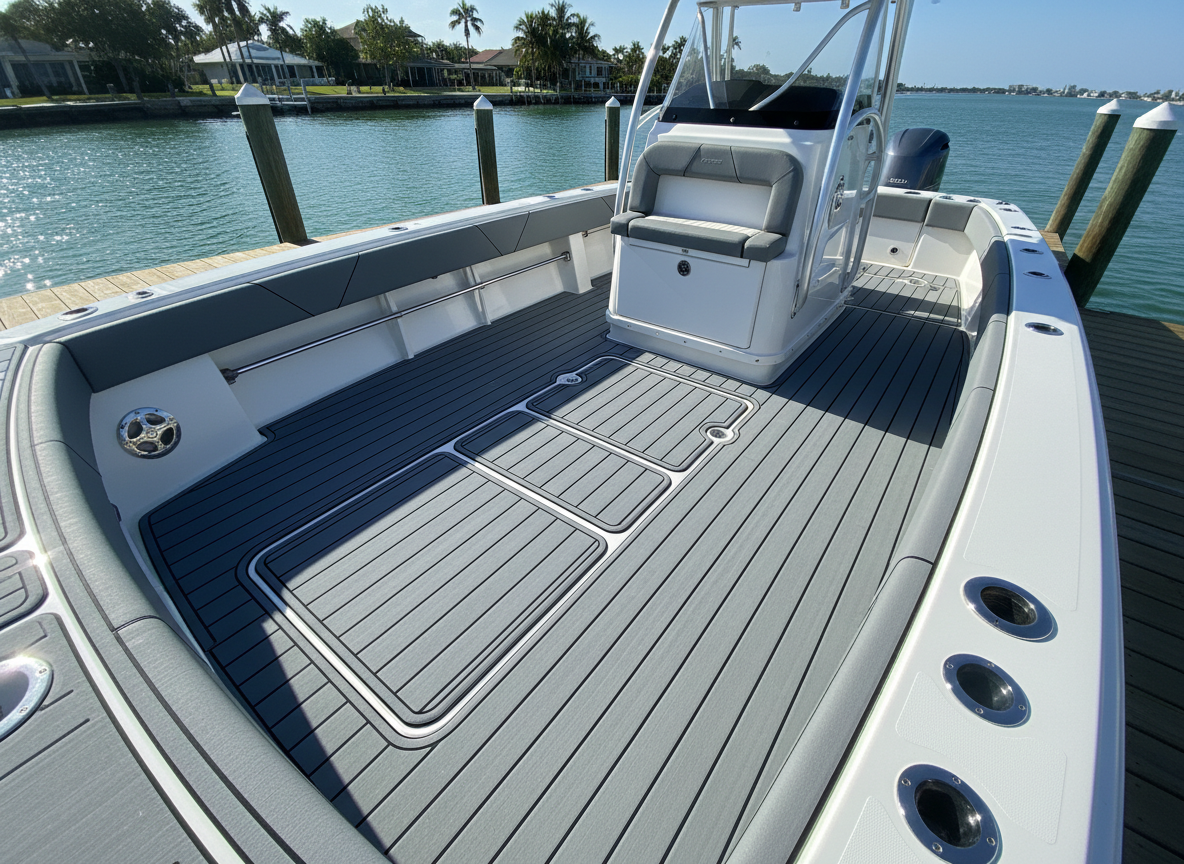
How to Cut EVA Foam Boat Flooring
EVA foam boat flooring is a popular upgrade for small fishing boats, center consoles, pontoons, and personal watercraft. It is comfortable underfoot, non-slip when wet, and available in lots of colors and patterns.
Many boat owners choose to start with full EVA foam sheets and create a DIY EVA boat floor to save money and customize the layout exactly the way they want. This step-by-step guide will walk you through how to cut EVA foam sheets cleanly and accurately so your new EVA foam decking looks professional, even if you have never installed it before.
Why EVA Foam Boat Flooring Is Great for DIY Projects
EVA (ethylene-vinyl acetate) foam boat flooring is light, soft, and easy to work with using basic hand tools. When purchased as raw material sheets instead of pre-cut kits, it gives you a lot of flexibility in how you lay out your deck. You can decide exactly where to place seams, add extra coverage in high-traffic areas, and experiment with design details like borders and inlays. For handy boat owners, cutting and installing EVA foam decking from sheets can be a satisfying weekend project that transforms the look and feel of the boat.
Tools and Materials You Will Need
Starting with the right tools and materials makes cutting EVA foam boat flooring much easier and safer. Here is a practical checklist.
EVA Foam Sheets
For most DIY EVA boat floor projects, look for:
- Thickness: Common options are 5 mm, 6 mm, or 9 mm. Thicker foam is more cushioned but slightly harder to cut through in one pass.
- Surface texture: Brushed, embossed, or faux teak (grooved) patterns. Choose a texture that matches your style and provides good grip.
- Adhesive backing: Most EVA foam decking sheets come with peel-and-stick pressure-sensitive adhesive. Make sure yours is marine-grade and suited to fiberglass, aluminum, or the surface you are covering.
- Color and pattern: Solid colors or two-tone designs. Plan your layout so the pattern direction and lines look intentional on the boat.
Cutting Tools
- Sharp utility knife with replaceable blades, or a snap-off blade knife for quick blade refresh.
- Straight edge or metal ruler (at least 24–48 inches long) for long, straight cuts.
- Flexible curve or French curve (optional) for smooth curves around hatches and corners.
- Cutting mat or sacrificial board (such as MDF, plywood, or a thick cardboard sheet) to protect your deck and keep the blade from dulling.
Marking and Measuring Supplies
- Measuring tape (preferably a locking 25 ft tape).
- Fine-tip permanent marker or pencil that will show on the EVA foam without smearing.
- Masking tape or painter’s tape for holding paper templates together and labeling sections.
- Paper, plastic sheeting, or contractor’s paper for making templates of your deck.
Surface Prep and Finishing Items
- Deck cleaner or degreaser suitable for your boat’s surface.
- Rags, sponges, and a bucket of fresh water for rinsing.
- Fine-grit sandpaper (180–220 grit) to lightly scuff glossy gelcoat or painted areas if needed.
- Isopropyl alcohol and lint-free cloths for final wipe-down before installation.
Safety Gear
- Cut-resistant gloves or work gloves to protect your hands.
- Knee pads or a kneeling pad for comfort while working on the deck.
- Safety glasses if you are sanding or working in dusty areas.
Preparation: Set Yourself Up for Clean Cuts
Before you slice into your new EVA foam sheets, good preparation on the boat and with your templates will save you from costly mistakes and wasted material. Think of this stage as your “mock install” where you plan every piece of your DIY EVA boat floor.
1. Thoroughly Clean the Deck
- Remove all loose gear, mats, and old flooring if applicable.
- Vacuum or brush away dirt, sand, and debris.
- Wash the deck with a marine-safe cleaner or degreaser, paying special attention to oily spots and footprints.
- Rinse with plenty of clean water and let the surface dry completely.
- If your deck is very glossy, lightly scuff it with fine-grit sandpaper to increase adhesion, then vacuum and wipe clean.
2. Make a Full-Size Template
For complex deck shapes, a full-size template is the secret to getting a tight, professional fit without constantly trimming on the boat. You can use heavy paper, cardboard, or thin plastic sheeting.
- Lay the paper or plastic directly on the deck surface for one section at a time.
- Tape pieces together as needed until you cover the entire area you want to receive EVA foam decking.
- Use a marker to trace along the edges, around hatches, drains, and hardware bases.
- Mark centerlines, alignment marks, and any features you want to highlight with seams or borders.
- Trim the template carefully with scissors or a utility knife until it fits snugly in place with minimal gaps.
3. Label Sections and Orient Your Layout
- Divide large areas into manageable panels (for example, bow, mid-deck, cockpit, swim platform).
- Label each template clearly (e.g., “Bow Port 1”, “Cockpit Center”).
- Indicate forward direction with an arrow on each template so you do not accidentally flip it later.
- Note where any seams will fall and how they line up with deck features or factory non-skid patterns.
4. Check the Grain or Pattern Direction on Your EVA Foam Sheet
Many EVA foam boat flooring sheets, especially faux teak styles, have a visible grain or linear pattern. Consistent orientation is crucial for a professional look.
- Lay your EVA foam sheets flat in a clean area, like a garage floor or large table.
- Identify the direction of any lines, brushed texture, or wood-grain effect.
- Decide how you want those lines to run on the boat (usually front to back or parallel to the centerline).
- Lightly mark the “forward” direction on the back of each sheet before you begin tracing templates.
How to Cut EVA Foam Boat Flooring from Sheets: Step-by-Step
With your deck prepped and templates ready, you are now set to cut the EVA foam sheets. Take your time, keep blades sharp, and follow this process for clean, accurate pieces.
Step 1: Set Up a Safe Cutting Area
- Choose a flat, stable surface such as a workbench or clean floor.
- Lay down a cutting mat, sacrificial board, or thick cardboard to protect the surface.
- Unroll or lay the EVA foam sheet face down (adhesive backing side up) if the pattern is visible through the backing, or face up if not.
- Make sure you have plenty of light so you can clearly see your cut lines.
Step 2: Transfer the Template to the EVA Foam Sheet
- Place the template on the back of the EVA foam sheet, aligning your “forward” arrows and pattern direction.
- Use masking tape to hold the template firmly in place so it does not shift while you trace.
- Trace around the template with a fine-tip marker or pencil, keeping the writing instrument vertical so the line matches the template edge closely.
- Add any interior cutouts (such as for hatches or drains) by carefully tracing inside those template openings.
Step 3: Mark Cut Lines and Reference Points
Before picking up the knife, double-check your layout on the EVA foam sheet.
- Mark reference points like the centerline, forward direction, and any alignment marks that will help when you install.
- Highlight areas that require extra precision, such as tight corners or around fixtures.
- If you want a small gap around the edges (for drainage or caulking), note how much to trim inside the template line (commonly 2–3 mm).
Step 4: Rough Cut the Panel
Start by separating the panel from the larger sheet before fine-tuning the edges.
- Using your utility knife and straight edge, make wide, rough cuts several centimeters outside your final line to free the piece from the sheet.
- Keep the blade at a comfortable angle and use moderate pressure to avoid wandering off the line.
- Focus on safety and control rather than perfect accuracy in this stage.
Step 5: Make the Final Trim Cuts
This is where you follow your traced lines carefully to create the final shape of each EVA foam decking panel.
- Place the rough-cut piece back on the cutting surface with your cut lines clearly visible.
- Use a sharp, new blade for each major panel. EVA foam cuts best with a very sharp edge.
- For straight sections, hold the metal straight edge firmly along the line and pull the knife smoothly along it.
- Make multiple light passes rather than trying to cut all the way through in one go. This reduces tearing and keeps the edges cleaner.
- For gently curved sections, guide the blade by hand with slow, controlled movements, rotating the foam as needed.
Step 6: Cutting Curves, Corners, and Around Hatches or Drains
Complex shapes are usually what separate a neat DIY EVA boat floor from a sloppy one. Patience is key here.
- Inside corners: Make two intersecting cuts that meet cleanly in the corner. Avoid over-cutting past the intersection to prevent visible gaps.
- Outside corners: Cut slightly long, then shave back tiny amounts until the corner is crisp and square.
- Curves: Use a flexible curve guide or create a smooth curve freehand in shallow passes. Do not force tight curves in one pass.
- Hatches and drains: Cut out the opening slightly undersize first, then fine-tune the edges during a dry fit on the boat.
Step 7: Test-Fit and Fine-Tune on the Boat
Before you even think about peeling adhesive backing, every piece of EVA foam boat flooring should be test-fitted in position.
- Lay the cut panel on the deck in its final location, making sure the pattern direction is correct.
- Check all edges, corners, and openings for tight, even gaps.
- If a spot is too tight or interferes with hardware, mark the area lightly, remove the panel, and trim a small amount at a time.
- Repeat the fit-and-trim process until all panels sit flat without buckling or forced stretching.
Tips for Straight Cuts and Clean Edges
Even if you are new to cutting EVA foam sheets, these simple habits will help make your DIY EVA boat floor look like it was professionally installed.
- Always use sharp blades: Dull blades crush and tear foam. Change blades frequently, especially after cutting through adhesive backing.
- Cut on a firm base: Soft surfaces cause the blade to sink unevenly. A solid board with a thin cutting mat on top works well.
- Let the knife do the work: Apply steady, moderate pressure instead of forcing the cut, which can make the blade wander.
- Score, then deepen: First lightly score the line, then make one or two deeper passes to cut through fully.
- Keep the knife vertical: Tilting the blade creates beveled edges that may show gaps on the boat.
- Wipe away debris: Brush away foam crumbs from the cutting area so they do not get trapped under the straight edge.
Safety and Quality Tips While Cutting EVA Foam Decking
Good safety habits will protect you and your boat, and they also improve the final quality of your EVA foam boat flooring.
- Wear gloves when cutting: Utility knives are very sharp. Gloves add a layer of protection as you handle long pieces.
- Cut away from your body: Always direct the blade away from your hands and torso to reduce the chance of injury.
- Use a sacrificial board: Never cut directly on your gelcoat or vinyl. A cheap sheet of plywood is far less expensive than deck repairs.
- Work in the shade or indoors: EVA foam and adhesive can soften in direct sun and heat, making measurements and cuts less precise.
- Keep the deck dry and clean: Moisture and dust can reduce adhesive strength later on, so avoid cutting on a dirty or wet surface.
- Test-fit before peeling backing: Once the adhesive touches the deck, it is hard to reposition. Final trimming should be finished before installation.
- Take breaks: Fatigue leads to mistakes. Short breaks help you maintain a steady hand and accurate cuts.
A Better Option: Let Professionals Design and Pre-Cut Your EVA Foam Flooring
If you like the idea of DIY EVA boat flooring but worry about making complex cuts, wasting material, or getting the pattern perfectly aligned, there is an easier path. Our professional EVA foam boat flooring manufacturer can scan or template your boat, design a complete layout in CAD, and machine-cut every panel to fit. You still get to choose colors, patterns, and logos, but you skip the most time-consuming and error-prone steps of cutting EVA foam sheets by hand. The result is a cleaner fit, crisper edges, reduced waste, and a much faster install day on your boat.
DIY from EVA Sheets vs. Professional Pre-Cut Kits
Both approaches can give you a great-looking EVA foam boat flooring upgrade. Which one is right for you depends on your budget, available time, and how comfortable you are with detailed cutting and templating.
- Fit and accuracy: DIY from sheets relies on your templates and cutting skills. Professional kits are CNC-cut from digital patterns for your exact model or a custom scan, usually resulting in a tighter fit.
- Finish quality: Careful DIY work can look excellent, but machine-cut edges and precise seams from a manufacturer tend to be more uniform, especially on complex boats.
- Time investment: DIY EVA boat floor projects can take many hours of templating, cutting, and test-fitting. Pre-cut kits remove most of that time, leaving you primarily with surface prep and installation.
- Waste and material use: When you cut EVA foam sheets yourself, it is easy to mis-cut a piece and need extra material. Professional layouts are optimized to minimize waste.
- Design options: Manufacturers often offer custom logos, multi-color inlays, beveled edges, and complex patterns that are difficult to replicate by hand.
- Cost: Raw EVA sheets are usually cheaper upfront. However, if you factor in potential waste, extra tools, and your time, a pre-cut kit may be closer in total cost than you expect.
Conclusion: DIY Is Doable, and Help Is Available
Cutting EVA foam boat flooring from full sheets is absolutely within reach for a careful DIYer. With good templates, sharp tools, and patience, you can create a custom EVA foam decking layout that refreshes your boat and makes every outing more comfortable. Take your time with preparation, double-check pattern direction, and always test-fit panels before installing them permanently. And if you decide you would rather focus on enjoying the boat while someone else handles the design and cutting, professional pre-cut EVA foam kits are ready to give you a fast, clean result. Either way, upgrading to EVA foam boat flooring is one of the most satisfying improvements you can make to your vessel.
Leave a Reply